This is a great use for leftover (dry) shredded wheat cereal. Makes a dense shortbread-like cookie with a bit of crunch and just enough of a hit of chocolate to keep me happy.
Background
Sometimes I make a recipe and I love the idea or some key part of it, but there are also a few things about it that just bug the bejeezes out of me and I want to KEEP making the recipe again until I get it where I want it to be. Sometimes it works out! This is one of those.
Original/source recipe
This started out as the vegan chocolate oatmeal bars from A Virtual Vegan, which are very tasty but also, for me, posed some interesting questions.
Pros:
- Oatmeal and chocolate!
- Nice, dense texture with a bit of crumbly crunch!
- A bit sweet but not very sweet!
- Just enough salt to add a little savory something!
- Vegan!
Cons:
- Chocolate ganache used a lot of milk so it was very loose and did not want to set even after some time in the fridge.
- The loaf-slice “bar” format seemed fun until I tried to eat a piece. I ended up with a rather large bread-slice of cookie/cake, with a bunch of chocolate ganache on top that wanted to fall off (or was all to one “side” depending on how you eat it. Kind of like if your pizza cheese was an inch thick and located only on the edge of the crust).
- Shocking to say, but it seemed like too much chocolate (???? …I know.)
Some of this maybe was me not doing the original recipe quite right the first time, who knows. But I kept mentally puzzling over WHY the recipe didn’t end up being what I thought it COULD be and/or wanted it to be. So I thought about it for two weeks and then made these.
My version
This recipe is still kind of in process so I might make a few more changes, but the key things I adjusted for now were:
- Subbed almond flour for 1/3c of the normal flour to give it a bit of extra density
- Replaced oats with shredded wheat cereal, whirled in food processor (no real reason for this other than that M. bought cereal he decided he didn’t want and I wanted to bake something with it)
- Increased milk since ground up cereal soaked it up
- Reduced salt a bit
- Halved chocolate
- Reduced amount of milk added to chocolate to make ganache so it would be less runny
- Instead of putting in a loaf pan, I rolled this out in a thick dough and stamped out as cookies.
What I’m still thinking about: Next time I will try adding a pinch of nutmeg to the dough, and maybe something fun into the chocolate (peanut oil? Rum flavored extract?). Maybe add a very small splash of lemon or Apple cider vinegar in the dough and then reduce the salt a bit. Some crushed, toasted nuts (cashews?) might be nice. But I’m happy with this version (for now).
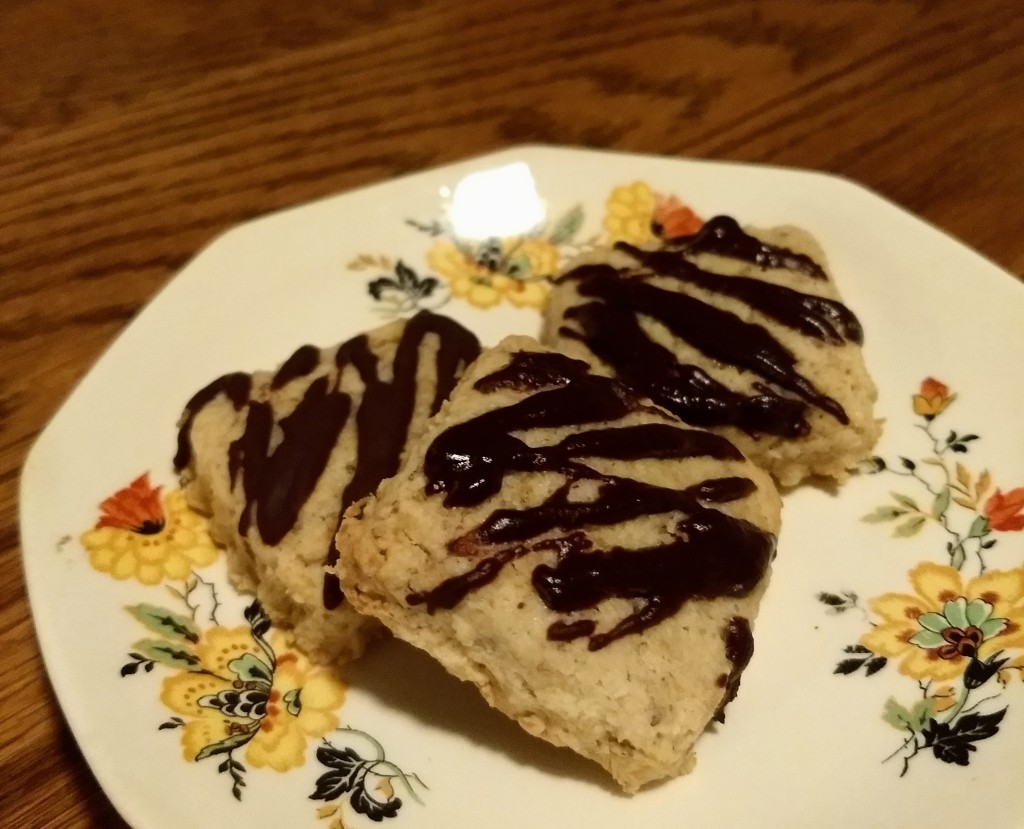
Recipe for Shredded Wheat shortbread cookies with chocolate drizzle
Makes: About 34 2″ cookies.
Prep time: 60 to 90 min
See bottom of post for photos.
Ingredients:
- 1 1/2 c plain shredded wheat cereal, crushed and whirled in food processor before measuring. (If you buy the large shredded wheat “biscuit” type that comes in squares the size of a small country, this is 4 squares or 2 packets. I used Barbara’s brand)
- 1 2/3 c all purpose flour
- 1/3 c almond flour
- 1/2 tsp baking powder
- 1/8 tsp salt (up to 1/4 tsp of you are used to more salt in food)
- 1 c sugar
- 1 tsp vanilla
- 1c to 1 1/2 c unsweetened dairy-free milk (I used Almond Breeze Unsweetened Vanilla), separated into: 1/2 c, 1/4 c, and “the rest”
- 1/2 c coconut oil, melted together with only 1/2c almond milk.
- 1/2 c vegan semisweet chocolate chips
Instructions:
- Preheat oven to 350⁰F and put parchment paper on 2 baking sheets.
- In a large bowl, mix all dry ingredients, including sugar.
- In a separate bowl, combine coconut oil and the 1/2 c almond milk. Melt in microwave on half power or for 10-20sec at a time until just melted. Mix in vanilla.
- In the middle of the dry mix make a hole and pour in the wet mix.
- With a fork, or a hand- or stand-mixer on low, combine wet into dry. It will probably be mostly gritty crumbs and not stick together.
- Add more milk as needed in 1/4-cup increments until the dough sticks together enough to roll into one big ball without looking shaggy (bits shouldn’t be sloughing off a lot if you pick it up)
- Take one of your parchment papers from your baking sheets and put it on the counter. Sprinkle flour on top of the paper, put the dough ball on that. Sprinkle more flour on dough and pat the dough into a flattish shape. Use a rolling pin (or press with the heel of your hand) to roll out your dough to a thickness of about 1/3″ (or about 1cm). Sprinkle more flour as needed while rolling it out. Try to roll it squarish if you can.
- Cut out your cookies into 2″ squares and transfer to papered baking sheet. I used a ravioli stamp, you could instead use a cookie cutter that’s round or square, or just cut them with a knife. If they want to stick to the paper, flour a thin spatula or knife and pick them up with that. Space about a half inch apart. When it’s all remainders, use your hands to squish the remainder into a new dough to stamp out the rest.
- Put cookies in oven and set timer to 10min.
- Put chocolate chips in a bowl and set aside. In another cup or bowl heat up 1/4 cup milk in microwave. Pour half of it over chocolate. Stir gently for about 30 seconds. If it does not melt fully, add a bit more milk, I didn’t use the full 1/4c and preferred toor microwave partially melted chocolate mix on 1/3 power in 20sec increments until it’s fully melted.
- Cookies need to bake for about 15min total but you will check and rotate them at 10min. To check them, remove the tray from the oven and look to see if there is a bit of blush at the outer corners of the cookies. You can also use a fork or spatula to lift a corner cookie gently and check the bottom. If the toasted area isn’t noticeable on at least 3 sides, put them back in the oven (rotate pan) and recheck every 5min. When they are blushed / toasted on at least 3 outside edges of the underside of the cookie, but the middle of the cookie’s underside is still not toasted, they are ready!
- Let cool on pan or rack for 10min.
- Gently pick up cookies and arrange them right next to each other.
- Re-melt chocolate in microwave at low power if it hardened up a bit; it needs to be wet. Now, using a fork held close above cookies, gently drizzle wet chocolate back and forth onto them.
- Before putting cookies in a container, let sit for 30mn (or refrigerate) to allow chocolate to lose its wet shine and fully set. Check by tapping with a finger, if you don’t make a mark then chocolate is set.
- Eat within about 4 days.


(Note: un-drizzled cookies in back-right of photo are overdone, you can recognize this when the toasted edge has moved beyond just the outer tips of the corners that you see when the cookies are right-side-up, and the toasted color has crept up the the outside edges of the cookies’ flat sides)