Archive for ‘Cakes’

February 4, 2012

Pumpkin Cupcakes with Penuche Frosting

by cillefish

I love pumpkin bread, and pumpkin cupcakes are even better …but for a brown, spicy, fall-flavored something like pumpkin bread, you need frosting to match. This simple penuche frosting comes from a recipe for applesauce cake, and makes a stiff, fondant-looking frosting somewhere between a brown-sugar glaze and maple syrup candy.

pumpkin cupcake topped with penuche frosting

This recipe (based on this one) is like real bread: time-consuming in spurts, with a lot of periods where you just ignore it and go do something else.

Beforehand: Clear a shelf in the fridge to accommodate a cookie tray full of cooling cupcakes. Prep cupcake pan. Gather a wooden spoon; a medium sized, heavy saucepan; and an empty cookie sheet. If you want to serve these with hot apple cider and some ice cream, get that together too.

Penuche-Frosted Fall Pumpkin Cupcakes

Pumpkin Cupcakes

  • 1 3/4 c all-purpose flour (or 1c wheat flour and 3/4 c white)
  • 1/2 tsp salt
  • 1 tsp baking powder
  • 1 tsp ground cinnamon
  • 1/2 tsp freshly grated nutmeg
  • 1/4 tsp allspice
  • 4 Tbsp unsalted butter (or 1/3 c applesauce)
  • 1 c packed dark-brown sugar
  • 1/2 c white sugar (make it a heaping cup if your brown sugar is dark-brown
  • Optional: 1/2 tsp to 1 tsp molasses
  • 1/4 c vegetable oil
  • 2/3 c water
  • Scant 1 c canned pumpkin puree (not “pie filling”!)
  • 2 large eggs or egg equivalent

Penuche Frosting

  • 3/4 c firmly packed light brown sugar (or half granulated, half dark-brown)
  • 3 Tbsp butter
  • scant 1/8 c milk (I used light soymilk and added a pinch of powdered xanthan at the end before the cooling stage to help make sure things bound properly. Despite the name and its prevalence in long lists of suspicious-looking filler ingredients, xanthan gum is a natural ingredient and a pretty cool substitute for gelatin to help firm things up).
  • pinch of salt

Pumpkin Cupcakes instructions:

  1. Butter (or add cupcake papers to) a 12-cupcake pan. In a small bowl, whisk together flour, salt, baking powder, spices. In a larger bowl, beat together butter, sugars, and oil on high speed until fluffy, scraping sides often.
  2. Add pumpkin and mix until blended. Add eggs or equivalent, one at a time, and mix until just incorporated. Mixing slowly, add flour mix and water until just incorporated.
  3. Spread batter into prepared pan and bake until a toothpick inserted into center comes out clean, ~50min.
  4. Remove from pan (if using cupcake papers) or let sit in pan 20min, and allow to cool completely so that frosting won’t detach itself. Start making penuche frosting when the cupcakes are mostly cooled.

Penuche Frosting instructions:

  1. Combine all frosting ingredients in heavy saucepan over medium-low to medium heat stirring with a wooden spoon until boiling (boiling sugar is HOT, so be careful!). Reduce heat to a simmer and let it cook undisturbed for about 5min, or until it registers 234F on a candy thermometer (I don’t have one).
  2. Have cupcakes ready, removed from their pan and assembled next to the cookie sheet.
  3. Remove frosting from heat, add xanthan (if using), and stir vigorously (don’t splash) until well combined again, then keep stirring gently until mixture starts to look a little paler and lose its gloss. This mixing / cooling process may take 5-10 minutes of pretty lazy stirring.
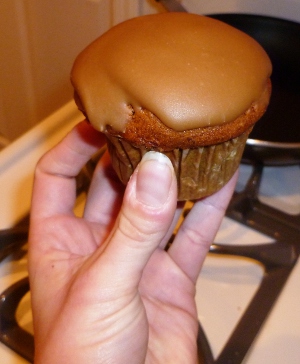
    What to look for: A blop of the mix, removed with a spoon and drizzled back into the rest of it, should retain some type of shape for several seconds, demonstrating some reluctance to melt back in right away. What we want is frosting that will cool enough on the cupcake that it will harden up before dripping off the edges. The penuche will still have a bit of translucency, but it will look a bit closer to homemade caramel than to maple syrup.
  4. Immediately begin to dip tops of cupcakes in still-wet frosting mix: invert cupcake, dip, twist, and then wipe off the edges against the side of the penuche pan.
  5. Assemble frosted cupcakes on the cookie sheet as they are frosted. One or two drips are OK, but if the 1st one is dripping before the time you get to the 3rd or 4th one, you need to wait a few more minutes.
  6. Put cookie sheet full of cupcakes into refrigerator to cool. Penuche should lose remaining translucency to look like in picture.

Serve cold, with hot apple cider and a bit of light vanilla ice cream.

January 22, 2012

Earl Grey Velvet Cupcakes

by horseradishsauce

I found this Earl Grey Red Velvet Cake recipe a while ago and I’ve been wanting to try it. My friend had a Mary Kay party yesterday, so I decided to make these. The majority of people at work are Army guys who eat frozen food or eggs and protein powder for the majority of their meals, and they tend to class all food into “good” or “bad”, which is not the audience you want to try out new and unusual recipes on.

‘The Island of Dr Gâteau’ is a very cool blog by a cognitive neuroscientist who experiments with food and writes about the biology and psychology of eating. She makes many variations of red velvet (Vanilla Chai White Velvet and Burnt Butter and Pecan are the next ones I’ll try, I think) and I decided to try her Earl Grey Black Tea Red Velvet Cake.

As it turns out, all the ladies at this party were middle-aged school teachers and they were all on diets. My friend who was selling Mary Kay is a triathlete, so she ate two cupcakes. I’m working on a six pack so I wasn’t planning to eat any, but I love Earl Grey so I had to try it. It was amazing. I think this is my favorite cake I’ve made. Dr. Gâteau said the taste was subtle, but I think it was quite strong in mine–a deliciously light, almost citrus flavor from the bergamot.

I didn’t follow Dr Gâteau’s recipe exactly–rather, I used her idea of steeping Earl Grey in butter the night before and used that butter in the Red Velvet recipe I usually use. The only issue I ran into was that, while I steeped the tea in enough butter for both the cake and the frosting the night before, after melting it, steeping the tea, refrigerating it, melting it, and putting it through a sieve, I was 4 tablespoons short and had to use non-Earl Grey butter in the frosting. In the recipe below, I’ve added my guessed amount of extra butter needed for the flavoring.

The original ‘Anne’s Eats’ recipe uses vegetable oil instead of butter. I don’t know how steeping tea in vegetable oil and then refrigerating it would turn out, though. As Dr. Gâteau points out in her recipe, fats hold odor and flavor molecules better than water, so I think it would still work. I don’t suppose vegetable oil would quite solidify, but I think the point is to let it absorb the flavors for 24 hours more so than have it solidify.

I also didn’t add food coloring, and they turned out a nice pale brown. I found a recipe for red velvet using grated beets to color the cake, so I might try that next time, for I do love the color of beets.

Earl Grey Velvet Cupcakes
Adapted from ‘The Island of Dr. Gâteau” and “Annie’s Eats”
Yield: 1 9 x 13 sheet cake or about 24 cupcakes

For the Earl Grey Butter:

  • For a full 24 cupcakes, use 4 sticks of butter. For a half recipe, try 2.5 sticks. Expect to lose about 4 tablespoons in the melting/solidifying process.
  • 3 heaping tablespoons loose-leaf Earl Grey (1 heaping tablespoon is about 5 tea bags)

For the Cake:

  • 2½ cups cake flour
  • 1½ cups sugar
  • 1 teaspoon baking soda
  • 1 tablespoon cocoa powder
  • 1 teaspoon salt
  • 2 large eggs
  • 1½ cups Earl Grey butter
  • 1 cup buttermilk*
  • 2 tablespoons (1 oz.) liquid red food coloring (optional. Or use any color you choose OR 1 cup finely-grated beets)
  • 1 teaspoon vanilla extract
  • 1 teaspoon distilled white vinegar

*OR make your own buttermilk:

  • 1 tablespoon white vinegar or lemon juice
  • 1 cup minus 1 tablespoon milk

Put vinegar/lemon into 1 cup measuring cup. Add milk to complete 1 cupful. Let stand for 5 minutes. Utilize.

For the frosting:

  • 8 oz. cream cheese, room temperature (if you use cold cheese and butter, the consistency will be better. If you’re beating the frosting by hand, use room temperature cheese and butter)
  • 5 tablespoons Earl Grey butter, at room temperature (add regular unsalted butter if you didn’t make enough tea butter)
  • 2 teaspoons vanilla extract
  • 1/4 cup strong Earl Grey tea (steeped for 10 minutes)
  • 2½ cups confectioners’ sugar, sifted

Directions:

The night before you want to make the cake:  If you’re making a sheet cake, save the wrappers for greasing the pan on baking day. Melt the butter in a saucepan over very low heat. Once it is melted, take it off the heat. Add in the loose-leaf Earl Grey tea and stir. Leave at room temperature for an hour, then transfer to covered bowl and place in the fridge overnight.

The next day: Place the re-solidified butter in a saucepan again (you may have to microwave the bowl for 20 seconds or so to get the butter to dislodge) and melt over a very low heat until liquid. Strain out the tea by pouring the liquid butter through a sieve into a bowl (when I did this, some of the leaves got through the strainer. You could hardly see them in the final cake and they weren’t noticeable in texture). Press the tea into the sieve with a spoon in order to squeeze out the butter that it has absorbed. Leave the butter at room temperature for an hour, then place it back in the fridge for an hour or so, checking it regularly, until it has firmed up and is the consistency of soft butter.

Preheat the oven to 350° F.  If making cupcakes, line cupcake pans with paper liners. If making sheet cake, grease and sift a little flour into a sheet pan (this just keeps the cake from sticking. It’s unnecessary. I use the butter wrappers so you may as well…).
In a medium bowl, combine the cake flour, sugar, baking soda, cocoa powder and salt; whisk to blend.  In a separate bowl, combine the eggs, butter, buttermilk, food coloring, vanilla and vinegar.  Beat until somewhat blended (it won’t really blend, and as soon as it’s smooth, it’ll separate again. Don’t worry about it).  Mix in the dry ingredients and beat until smooth, about 2 minutes.

Divide the batter evenly between the prepared liners or pour it into the single sheet pan.  Bake, rotating the pans halfway through baking, until a toothpick inserted in the center comes out clean, about 18 minutes (more like 30 for a sheet cake).  Let cool in the pans 5-10 minutes, then transfer to a wire rack to cool completely.

To make the frosting, combine the cream cheese and butter in a bowl and beat until well combined and smooth, about 2-3 minutes.  Mix in the vanilla extract and the tea.  Gradually beat in the confectioners’ sugar until totally incorporated and then beat until smooth.  Frost cooled cupcakes as desired.

August 8, 2011

Summer Blackberry Cornmeal Cake

by cillefish

This moist summer cake balances rich sour cream with cornbread’s grainy goodness — the result is fresh, summery, and sweet, but avoids the dense cakiness of winter treats. Adapted from this recipe by Matt’s mom.

  • 1 1/4 cups all-purpose flour (spooned and leveled)
  • 1/2 cup yellow cornmeal
  • 2 teaspoons baking powder
  • 1 teaspoon salt
  • 1/4 tsp freshly ground nutmeg*
  • 1 cup plus 2 tablespoons sugar, and 1/4 cup for sprinkling
  • 1/2 cup sour cream
  • 2 large eggs
  • 2 tsp vanilla extract
  • 7 tablespoons unsalted butter, melted, plus 1 tablespoon for skillet
  • 2 containers fresh blackberries (5.6 ounces each), or 11.2 ounces frozen, thawed, and drained (about 2 1/2 to 3 cups)

Preheat oven to 375°. In a large bowl, whisk together flour, cornmeal, baking powder, salt, nutmeg, and 1 cup plus 2 tablespoons sugar. In another bowl, whisk together sour cream, eggs, vanilla, and melted butter; pour over flour mixture, whisking to combine.

In a 10-inch skillet (preferably cast-iron; a large square stoneware or pyrex dish also works), heat remaining tablespoon butter in the oven until melted and skillet is hot, about 5 minutes. Remove from oven; swirl to coat bottom of pan. Pour batter into skillet; scatter blackberries on top, and sprinkle with remaining 1/4 cup sugar.

Bake, with a baking sheet on rack below (to catch any drips), until top is a toasty gold color, 45 to 50 minutes. Let cool slightly, about 30 minutes. Run a knife around the edge to loosen; cut into 8 wedges. Serve warm or at room temperature. Excellent with vanilla ice cream.

*Matt’s mom tells me she grinds fresh nutmeg into the dry ingredients until it looks right — I’ve never seen that in action, so 1/4 tsp seemed a reasonable guess based on other recipes I know that use nutmeg.

May 23, 2011

“The Math” – The 3 Rules of a Perfect Cake

by cillefish

I went to the library and found this baking cookbook that’s pretty wildly informative. So far I’ve learned a few things — like that over-leavening a cake deflates it, that Dutch process cocoa can mess up a recipe designed for the normal type because it’s more alkaline, and that you can darken up normal cocoa by heating it up in a saucepan with a little baking soda. Fun, science-experiment stuff.

Orange Cornmeal Olive-Oil CakeThis cookbook explained some basic guidelines (“The Math”) for putting together a good cake using today’s fancypants flour, which holds more sugar and fat than old-style flour. By weight, the rules go:

  • sugar must ≥ flour
  • eggs must ≥ fat
    (butter, shortening, & oil)
  • liquid (eggs, milk, water)
    must ≥ sugar

Not remembering what a tedious pain in the butt unit conversions are (4th grade was a while ago), I decided to use this to tackle an orange olive oil cornmeal cake recipe that had great flavor and a lovely crunchy top, but a too-dry texture—I decided to try The Math on it.

read more »